
SMART EXTENSION BOARD
- Anupam Sharma
- Dec 13, 2021
- 2 min read

Updated: Aug 4, 2023
Hello everyone,
In this blog, I will tell you how I made the smart extension board, what problems I faced while making this project and its advantages and disadvantages.
Materials required:
1: MDF board
2: Acrylic sheet
3: AC voltmeter
4: DC voltmeter
5: Switch
6: 6pin socket
7: 10k Potentiometer
8: lm317 ic
9: DC booster module
10: Charger
11: AC voltage regulator
12: Video male and female jack
13: Extension cord
Working:
CONSTRUCTION
Step 1:
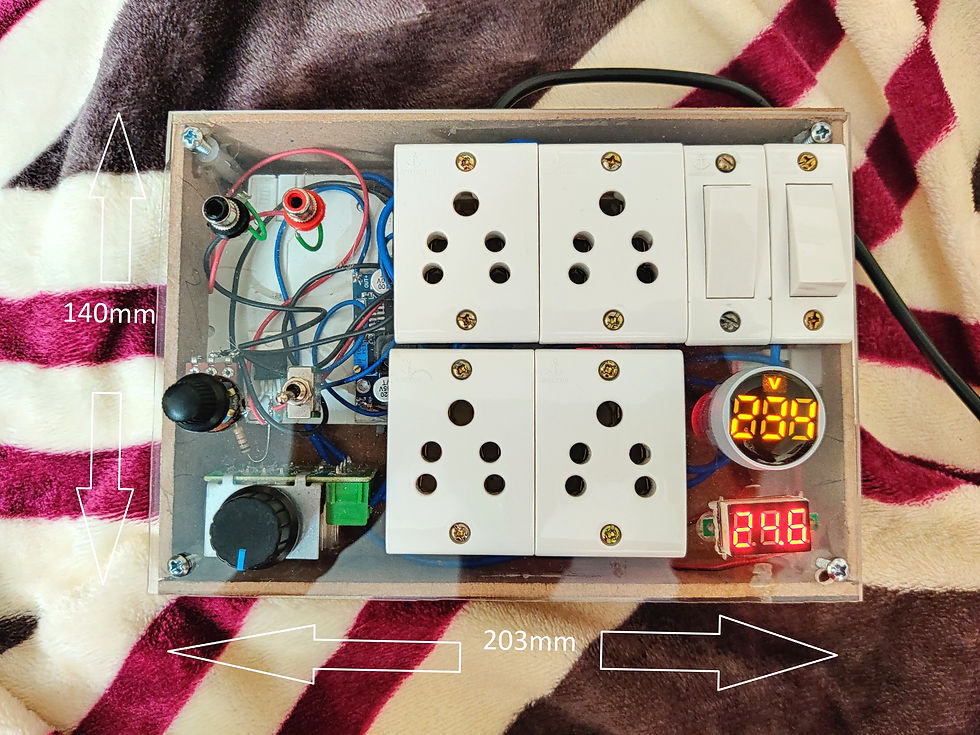
We need a box-type structure to seal all the working parts together. I used an MDF board of about 3mm, which helps me build a solid container to prevent the parts from damaging. My box is 203mm X 140mm X 51mm. Attach screw covers around the corners of the box so that you can easily open it whenever something is wrong with the extension board.


Step 2:
I took the acrylic sheet to make the topmost part of the box because I think it will look more attractive to see what's inside it. Cut the required amount of the acrylic sheet to fit switches, sockets, etc. After cutting, fix the sockets, switches and other components accordingly.
Step 3:
Do the connection of the AC circuit, as shown in the below circuit diagram.

Step 4:
Do the connection of the dc circuit, as shown in the below diagram.

Step 5:
Use a heavy power cord to connect it with the ac power line.

The problems I faced while making this project:
The problem I faced was about the structure. I had to find the suitable material for the structure to easily cut it with my mini-cutting tool; therefore, I used an MDF board of 3mm, which has all the requirements for the perfect structure.
I faced the problem of how can I quickly open it and close it? So I used the perfect item and here, screw covers come in handy.
I faced the problem of how can I regulate the dc voltage source? The dc booster module has a voltage regulator. Still, it is small, and it isn't easy to use it as a voltage regulator, so I made a separate voltage regulator using lm317ic and a potentiometer, as shown in the above diagram.
Advantages
It has a DC power source, so you can easily use any device based on dc source to check if it is working or not at its required voltage. This extension board is generally used by those who constantly make electrical projects.
It has a regulated AC power socket so that you can control the AC output for the machine as if you are using the Angle Grinder, you can control its speed using the AC regulator.
It has an MCB that provides safety to your appliances from short-circuiting.
It has a dc voltmeter and an ac voltmeter that shows how much voltage the dc and the ac appliances are running respectively.
Disadvantages
The dc power source has a current of about 1 ampere, so the appliance above 1 ampere cannot work with full efficiency.
Yeee...Like a pro! ☠️🔥
Umhmm Talented 🤌🏻
Mera bhi order lelo 😽
This is so usefullllllll
Ufffff ufffff 😳